 MINIMAX4 4000
Volt neon transformer........$19.50
 http://www.amazing1.com/voltage.htm
or
NEONXA 4000 Volt ......................................$20.95
Information Unlimited
P.O. Box 716, Amherst, NH 03031-0716
Parts you will need consist of the following:
12 - 14 volt DC,
3-4000 volt, 5 to 10 Milliamp car neon light transformer
See bottom of page for
recommended models and sources. Do not use a transformer larger than 4000volts,
10 milliamps. Do not attempt to use ANY transformer that operates on
AC Line voltage.
The following transformers are ideal for this
project:
 MINIMAX4 4000
Volt neon transformer........$19.50
http://www.amazing1.com/voltage.htm
or
NEONXA 4000 Volt
......................................$20.95
Information Unlimited
P.O. Box 716, Amherst, NH
03031-0716
The parts below can be aquired from Radio Shack or other electronics store:
1- metallic plate 4" x
3.5" (This is the size of Polaroid 600 film. If you are going to use different
film, you may use any size plate you want. This unit will only take images of a
few fingertips, however, if you wish to use larger film, you can do multiple
exposures. For example, on 8 x 10 film, you can make several images on different
parts of the film and make several sets of images on one piece of film, saving
the hassle of developing several pieces of film)
Suitable materials to make the
plate:
- Copper
clad blank circuit board;
- Aluminum/Brass/ or any other metal plate
- A piece of plexiglas or even well
dried 1/8" or 1/4" plywood laminated with aluminum foil.
Spray adhesive works well for
securing the aluminum foil to the plate. Cover the plate with very thin
celephane or lamination plastic or mylar available at business supply stores, to
insulate it. Spray adhesive works good for this.
1- plastic/wooden/cardboard enclosure at least 2" tall x 4" wide x 4" deep [Optional: a wooden, plastic, or cardboard box at least 6" high x 16" wide x 10" deep for making a light-proof enclosure for using your camera in normal light. Also a yard or so of dark opaque fabric to use as sleeves for inserting hands and blocking out light]
1- 12-14 Volt DC Power
Supply
This
can be:
- Plug
in AC wall adaptor of at least 800ma output at 12-14VDC
- Battery holder with 8 AA or
larger batteries such as C or D.
- 2- 6 Volt Lantern Batteries
wired in series
- A Car or Motorcycle battery
- Whatever other 12 volt DC source you
can find that has at least 800milliamp output.
1- Connector for above
power supply
-For the AC wall adaptor, get a jack that your power supply plug
fits
- Battery
holders are often fitted with the same terminals that 9 volt transistor
batteries use. Get a 9 Volt battery connector. They are cheap.
- For the other sources, 2
#20 or larger wire leads with alligator clips on one end will work just
fine.
1- Momentary Contact Switch
(Normally Open Push Button)
About 7 feet of feet of hookup
wire
This
can be any stranded insulated wire from 20 guage to 16 gauge. 6 feet of this
wire is used to connect the unit to a ground. The rest will be used for hook-up
wire for connections within the unit.
1- Any miniature neon lamp
(OPTIONAL)
This will be used to monitor the high voltage output. It is not
required but nice to have since it is used in such a way that if it lights, you
are definitely getting a good output.
TOTAL PARTS COST IS UNDER $30 IF EVERYTHING IS BOUGHT NEW
1.
Checking Transformer to See if it is Safe to Use
IF YOU ARE USING ONE OF
THE TRANSFORMERS ON MY LIST ABOVE, YOU CAN SKIP THIS
PART
Connect Black wire of transformer input to the negative
pole of the 12-14 volt source and to a ground such
as:
- The
ground plug on any household receptacle
- A water pipe
- Any piece of metal that extends at
least 8 inches into the ground. A metal rod would work.
Make sure that the output lead(s) are away from your fingers and any other wires or metallic objects. If you touch the bare output wires while the unit is connected to votage you will recieve a slight burn similar to touching the tip of a red-hot needle. While not dangerous, it is uncomfortable. The input wires are totally safe to touch while it is connected since they are only 12-14 volts DC.
DO NOT TOUCH THE BARE OUTPUT WIRES WHILE THE TRANSFORMER IS ON. DO NOT TOUCH ANY UNINSULATED METAL TO THE WIRES. HANDLE ALL WIRES BY THE RUBBER INSULATION ONLY. ENERGIZING THE TRANSFORMER CAN INTERFERE WITH COMPUTERS, CABLE BOXES AND OTHER ELECTRONICS THAT ARE WITHIN 5-8 FEET. THE FCC DOES NOT LIKE THIS AND ACTUALLY HAS MADE IT A FEDERAL CRIME. OPERATE THIS THING AWAY FROM ANY COMMUNICATIONS DEVICES PLEASE.
Connect red wire of the transformer to the positive pole of your 12-14V source.
Take the output wire, holding it by the insulation, touch it to the ground wire and slowly pull it away. You should see a small electrical spark or arc being drawn. If the device has two output wires, try them both independently. You should be able to draw at least a 1/8" arc and maintain it.
The arc should have a hissing sound, and maybe an occasional gentle SLIGHT crackle.
WARNING
IF THE ARC MAKES A CRACKLING NOISE AND NOT A HISSING SOUND THE
TRANSFORMER FREQUENCY IS TOO LOW AND MUST NOT BE USED FOR MAKING A KIRLIAN
CAMERA! THIS TYPE OF POWER SOURCE CAN GIVE YOU SOME NASTY SHOCKS AND IS NOT
SUITABLE FOR KIRLIAN PURPOSES!
>Touching the high voltage
output wire to the positive 12 VDC input lead.
This burns out the transformer
instantly in many cases.
> Standing barefoot on the
ground or concrete floor and touching an energized Kirlian plate.
ALWAYS WEAR SHOES WHEN
TOUCHING AN ENERGIZED KIRLIAN PLATE EVEN IF IT IS INSULATED WITH PLASTIC OR
PHOTO PAPER. NEVER TOUCH ANY OTHER PERSON OR OBJECT WHILE TOUCHING AN ENERGIZED
KIRLIAN PLATE.
>Attempting to make a Kirlian Photo of a Cat's paw... If the cat is mellow he may let you do it. ( :
2. Checking Transformer Output
Polarity
[This is for
transformers that have two output leads. Some transformers only have one so this
would not apply to those. The transformers I listed in these instructions all
have 2]
Connect thin Black wire of transformer input to
the negative pole of the 12 volt source and to a ground source such as:
- The ground plug on any household
receptacle
- A water pipe
- Any piece of metal that extends at least 8 inches into
the ground. A metal rod would work.
Make sure that the output leads are away from
your fingers and any other wires or metallic objects.
The output leads are the ones with thick insulation. They
can be about any color. the difference between the output leads and the 12 volt
input power leads is that the output leads have much thicker
insulation.
DO NOT TOUCH THE BARE OUTPUT WIRES WHILE THE TRANSFORMER IS ON. DO NOT TOUCH ANY UNINSULATED METAL TO THE WIRES. HANDLE ALL WIRES BY THE RUBBER INSULATION ONLY.
Connect the thin red wire of the transformer to the positive pole of your 12 - 14V source.
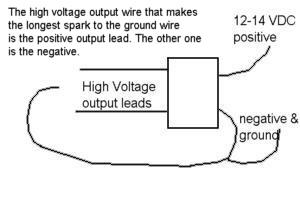
Holding the wire by the rubber insulation, touch the end of one of the output wires to a ground wire and slowly pull it away. Then do the same with the other wire. The wire that gives the longest arc is the Positive output.
Mark the positive output wire because you will
need to know which one is which later during construction. MARK THE OTHER
OUTPUT LEAD AS "NEGATIVE." TWIST THIS WIRE TOGETHER WITH THE NEGATIVE (BLACK) 12
- 14vdc INPUT WIRE FOR LATER CONNECTION.
1. Drill hole in the front of your enclosure for the momentary contact switch and install it.
2. Mount the plate on the top of your enclosure. Rubber cement works fine for this.
3. Drill or cut a small hole in the top of the
enclosure for the output wire of the transformer. Drill it right next to any
edge of the plate. 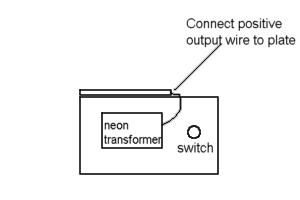 4. Mount transformer inside of enclosure. You may use
rubber cement ("Liquid Nails" adhesive is awesome but takes a long tiome to
dry), cable-ties, screws or any other suitable means. Just make sure that no
metal is near the output wires.
5. Connect the positive output wire of the
transformer to the plate. A small screw may be used for securing the wire to the
aluminum foil covered plate or in the case of a copper, copper clad or brass
plate it's best to solder it.
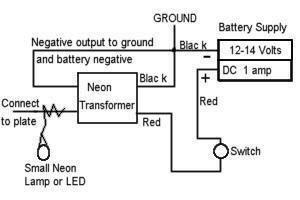 6. Connect a wire from the switch to the
positive (red) input wire of the transformer. Connect a wire from the other
terminal of the switch to the positive pole of your 12-14VDC power
supply.
7. Connect the negative (black) input wire from the Neon transformer to the negative pole of your power supply. Connect this to the NEGATIVE output wire and GROUND IT to a suitable ground source. If you do not ground the negative output wire, the unit will not be dangerous but you will not get a good output.
8. Mount the neon lamp in such a way that the leads of the lamp can be twisted around the insulation of the positive Output wire of the neon transformer. DO NOT CONNECT THE WIRES OF THE LAMP DIRECTLY TO THE OUTPUT OF THE TRANSFORMER. The lamp works by inductance. If the lamp lights, you definitely have a good output. If you connect the lamp directly to the output, you will burn it out.
9. Assemble the enclosure, if any. The unit is now ready to use.
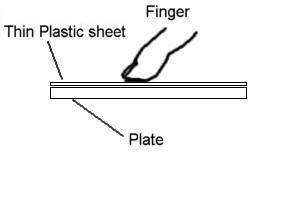 To test, cover the plate with a piece
of spent film or a thin plastic sheet such as mylar. Place one fingertip on the
plastic or film and push the button. You should hear a slight hissing sound and
if it is dark enough in the room, you should see a bluish discharge under your
finger and maybe a little tingle and/or heat.
IF YOU FEEL ANY SENSATION OF BEING SHOCKED, THE TRANSFORMER
YOU ARE USING IS THE WRONG KIND. There should be no extremely uncomfortable
sensation whatsoever. It is normal to feel some heat or a tingling sensation.
Some people are very sensitive to the tingling of the electricity. Although this
is uncomfortable for them, it is totally harmless.
CAUTION:
DO NOT TOUCH THE BARE PLATE WHILE IT IS ENERGIZED. ALWAYS
INSULATE IT WITH PLASTIC OR PHOTOGRAPHIC PAPER. THE SUBJECT SHOULD NOT
TOUCH ANY METAL OBJECT WHILE UNIT IS ENERGIZED. DO NOT TOUCH THE SUBJECT WHILE
UNIT IS ENERGIZED.
4. Using Your
Camera
Copyright 1999, Craig Bratcher May not be
reproduced or distributed without written permission
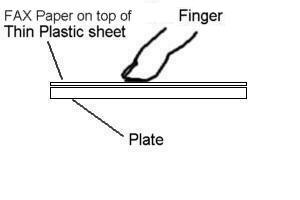 Testing your camera Place a
sheet of thermal FAX paper on the plate. Place one fingertip on the FAX paper
and press the switch for a few seconds. You should hear a little hissing sound,
and you should feel a little bit of heat. If it gets too hot, immediately remove
your finger to prevent a burn. An image will form on the FAX paper in after
about 10 or 15 seconds of exposure. Try placing a coin on the FAX paper. Run a
jumper wire from the grounded black battery wire to the coin and push the
switch. It should only take a few seconds for the coin to make an image on the
paper.
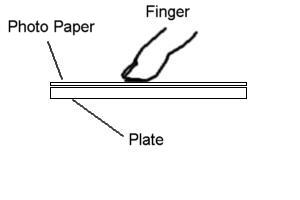 To make real photographs, room must be
totally dark. Place a piece of film on the plate. Place 1 to 3 fingertips on
the film and push the button. You should see a bluish purple glow under your
fingertip(s). Hold the button for 1 to 3 seconds. Place film in a
light-proof envelope and you may turn the lights back on.
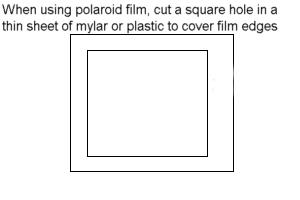 If you are using Polaroid 600 or other
instant film- DO NOT TOUCH THE WHITE BORDER OF THE FILM WHILE THE BUTTON
IS PUSHED! THE WHITE BORDER IS METALLIC AND THE ARC WILL GO THROUGH THIS AND
GIVE YOU A TINY BURN. It is advisable to make a mask out of a thin plastic sheet
that covers the white border and leaves the image area of the film open. You can
do this by cutting a 3" square hole in a 4" square piece of plastic sheet such
as mylar.
Another good idea is to use plastic PVC picture
frame material or the kind of PVC plastic trim that is used on bathrooms wall
panels. Make a small frame that the film can slide into that masks the metallic
border of the film.
FOR USE IN NORMAL LIGHT: 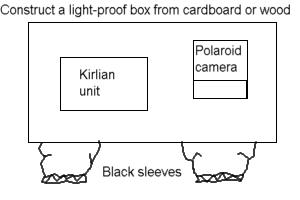 Make a light proof box out of cardboard or
wood that is big enough to fit the complete unit as well as allow room for your
hand. Using black or very dark fabric, make a sleeve with elastic on one end
similar to a coat sleeve. You may even use a sleeve from an old jacket. Put a
4-6 inch hole in the box and attach the sleeve to the hole using staples, glue
or other suitable means. It must be sealed so that no light can enter there. You
must devise some means of turning on the unit from outside of the box. It is a
good idea to design your camera so that the button is mounted on the outside of
this box. In the case of a cardboard box, the corners of the box are where the
light is most likely to leak. Make sure it's sealed good with dark opaque tape
or glue.
To use your camera, place your hand through the sleeve making sure no light is entering. Place a piece of film on the plate and put 1 to 3 fingertips on the film. Push the button for 1 to 3 seconds. Remove film from plate and place in a light-tight envelope before opening box.
USING POLAROID FILM
The best instant polaroid film to use is SX-70 or Time
Zero. Polaroid 600 film works fine but is not as high definition so the images
will not be as sharp.
1. Using your own
polaroid camera, insert a new film cartridge into your camera and close the
door. The protective cardboard sheet will eject, leaving a piece of film at the
top of the cartridge.
2. In total
darkness open the camera and remove the film cartridge. Place the entire
cartridge on the film plate of your Kirlian unit, face up. The induction of
the plate will be sufficient to energize the top piece of film in the cartridge
so there is no need for the film to directly contact the plate.
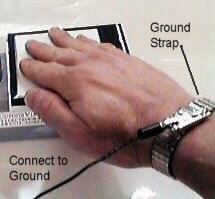 3. Because the film is separated from the
plate by the plastic cartridge, you will need to enhance the output with a wrist
ground strap. A piece of aluminum foil, folded and wrapped around the wrist, or
a metal wrist watch band, connected to a ground will work fine. You may also use
a ground strap, if desired, for images taken when film is placed directly on the
plate. The film will insulate you from the bare metal so it's completely
safe.*
A watch with a
metal band works great for a wrist ground strap. Place the ground strap on the
wrist of ht ehand you want to photograph, and use a wire to connect it to a
ground. Since the black negative battery wire has been grounded, you may connect
directly to it.
4. Place fingertips on the
film and take the image. Exposure time will vary from 3 second up to over 10
seconds.
5. Insert cartridge into your
Polaroid camera and close the door. Your film will be ejected and develop. After
this, it is safe to turn the lights on. Keep the unused film in the camera until
you are ready to make another photo.
PLEASE PRACTICE PUTTING THE FILM INTO THE CAMERA IN THA
DARK BY USING AN EMPTY FILM CARTRIDGE SO YOU DON'T WASTE FILM.
* WARNING: WRIST GROUNDING STRAPS CAN ONLY BE USED WITH UNITS THAT ARE LOW POWERED AS DESCRIBED IN THESE DIRECTIONS. IT IS DANGEROUS TO USE A GROUND STRAP ON ANY KIRLIAN UNIT THAT HAS ENOUGH POWER TO DO MORE THAN JUST 4 OR 5 FINGERTIPS.
PHOTOGRAPHING LEAVES, COINS AND OTHER SMALL SPECIMENS
Small specimens such as leaves and coins must
be grounded if you wish to photograph them. To do this, you may use a wire
with alligator clips on the ends. Connect one end to your ground source, and the
other end to the subject on the film. 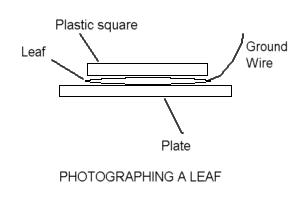 In the case of a leaf, choose a small specimen that is no
bigger than 1 inch long. Connect a ground wire directly to the tip of the stem
on the leaf. Cover the leaf with a small piece of plexiglas or other plastic
piece to hold the leaf flat on the film. This is essential for a good image.
Push the button for 1 or more seconds. You will have to adjust how much pressure
is being exerted on the leaf to get a good image. Too much pressure and the
image will be too dim. Not enough pressure and only part of the leaf will form
an image.
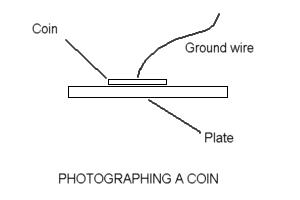 In the case of a coin, no plastic is
neccesary to hold the coin flat since it is heavy enough to lay flat by itself.
Simply touch the ground wire (holding it by the insulation) to the top of the
coin as it lay on the film and push the button for 1 or more seconds. Please
don't touch the coin while unit is on...
In all cases, you must determine how long to push the
button for the best exposure. 1 to 3 seconds seems to be OK. However, if the
specimen does not seem to be putting out much light (or "coronal discharge" as
it is called), you may hold the button for much longer and attempt a timed
exposure. Sometimes you cannot see the discharge because it is very tiny. But if
you hold the button for a 30 second exposure, the film will capture the
image.
PHANTOM LEAF EXPERIMENT
If you are lucky, you can capture the "pahntom leaf"
phenomena. Cut about 1/4" off the tip of a leaf and photograph it. See if you
can get an image of a whole leaf even though the tip is missing.
WARNING! REMOVE BATTERIES WHEN TRANSPORTING YOUR KIRLIAN CAMERA- ESPECIALLY IF IT IS TRANSPORTED IN A SUITCASE. PRESSURE FROM OTHER OBJECTS CAN PUSH THE PULSE BUTTON CAUSING THE CAMERA TO ACTIVATE. THE RESULTING ELECTRIC ARC CAN IGNITE MATERIALS TOUCHING THE PLATE AND CAUSE A FIRE.